[View] [Edit] [Lock] [References] [Attachments] [History] [Home] [Changes] [Search] [Help]
[console] Building s8vm for Ms Windows 64 bits
System requirements
A 64-bit Intel machine with at least 8GB of RAM. More than 16GB is highly recommended.
At least 100GB of free disk space on an NTFS-formatted hard drive. FAT32 will not work, as some of the Git packfiles are larger than 4GB.
Visual Studio 2015 Update 3, see below (no other version is supported).
Windows 7 or newer.
Git
V8 uses GIT so download and install it.
Install Visual C++ tools
Building V8 on Windows requires building tools that come with Visual Studio. As of December 8, 2016 Chromium requires Visual Studio 2015 Update 3 with the 14393 Windows SDK.
The installer can be downloaded free from Microsoft (require developer registration).
Ensure you have check to install the following features 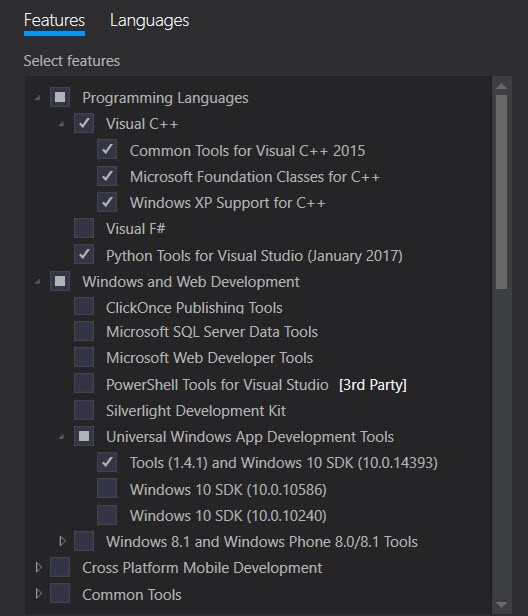
Eheck that the installer has installed folder Debug Interface Access (DIA) SDK and file vcvarsall.bat to the following directories:
- ...\Microsoft Visual Studio 14.0\DIA SDK
- ...\Microsoft Visual Studio 14.0\VC\vcvarsall.bat
For some reason these may be missing after the install.
Windows SDK
Since Chromium uses Debugging Tools For Windows which are not installed as part of VS installation, you’ll also need to install Windows SDK separately. Download the installer. Make sure you’ve selected the package in the installer: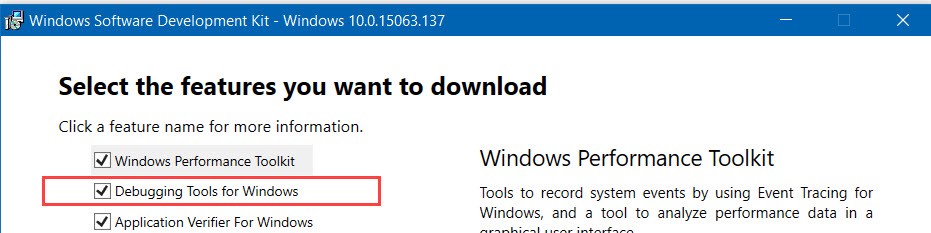
Install depot_tools
Download the depot_tools bundle and extract it somewhere.
| Warning: | DO NOT use drag-n-drop or copy-n-paste extract from Explorer, this will not extract the hidden “.git” folder which is necessary for depot_tools to autoupdate itself. You can use “Extract all…” from the context menu though. |
Environment variables
Add depot_tools to the start of your PATH (must be ahead of any installs of Python). Assuming you unzipped the bundle to C:\src\depot_tools, open:
Control Panel → System and Security → System → Advanced system settings
If you have Administrator access, Modify the PATH system variable and put C:\src\depot_tools at the front (or at least in front of any directory that might already have a copy of Python or Git).
If you don't have Administrator access, you can add a user-level PATH environment variable and put C:\src\depot_tools at the front, but if your system PATH has a Python in it, you will be out of luck.
You’ll also need to specify two environment variables:
- DEPOT_TOOLS_WIN_TOOLCHAIN=0
- GYP_MSVS_VERSION =2015
Update Depot tools
From a cmd.exe shell, run the command gclient (without arguments). On first run, gclient will install all the Windows-specific bits needed to work with the code.
If you see strange errors with the file system on the first run of gclient, you may want to disable Windows Indexing.
| Missing File (/U8/uploads/note.gif) | After running gclient open a command prompt and type where python and confirm that the depot_tools python.bat comes ahead of any copies of python.exe |
Download the V8 VM
Go into the directory where you want to download the V8 source into and execute the following in your terminal/shell:
fetch v8
cd v8
Building V8
Now we have environment ready to build V8. All commands should be executed using Windows Command Shell inside the V8 source directory.
Start with the downloading of all build dependencies by executing the following: gclient sync
Then generate the necessary build files by running the following:python tools/dev/v8gen.py x64.release
To embed V8 into console platform (s8vm) application we need to build it as a static library. To do that, we need to modify default build configuration and add these two flags to args.gn file: is_component_build = false
v8_static_library = true
Run the following to open the file ..\out.gn\x64.release\args.gn in an editor: gn out.gn\x64.release
Add the lines so the resulting file looks like this:
is_debug = false
target_cpu = “x64”
is_component_build = false
v8_static_library = true |
The last thing is to compile the source by executing the following:
| ninja -C out.gn/x64.release |
Run tests to verify that everything is built correctly:
| python tools/run-tests.py --gn |
Build result
The build generates ..\v8source\out.gn\x64.release\obj folder with many static library files (.lib) : v8_base.lib, v8_libbase.lib etc. We will use these files when embedding v8 into our s8vm application.
Embedding V8 into s8vm application
Create a new console application with Visual Studio.
In the New Project dialog box, select Win32 Console Project in the Templates pane to open the wizard.
Set the name of the project to s8vm
This creates Win32 application but we want s8vm built for x64 architecture so we need to modify the project a bit.
Go to project properties and select x64 active solution platform: 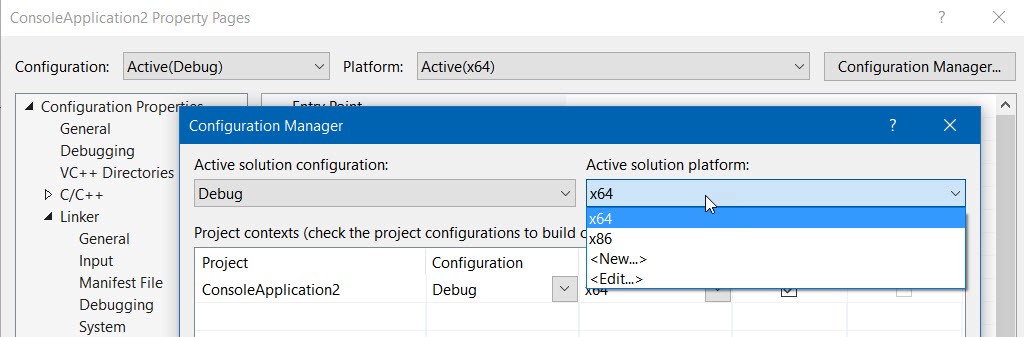
Also, we need to make the application to use the multithread, static version of the run-time library: 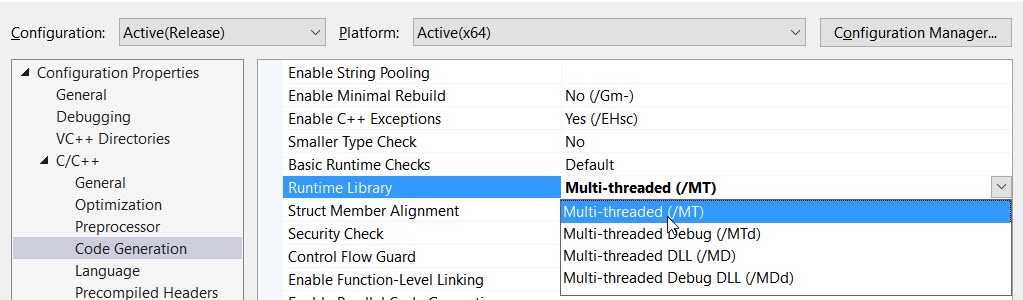
Configure include and library directories
Next, we need to add folders to look for V8 header files to Include Directories: 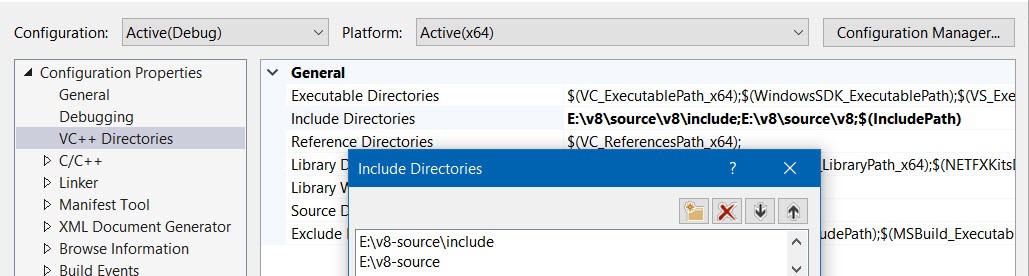
And add folders with V8 static library files to Library Directories: 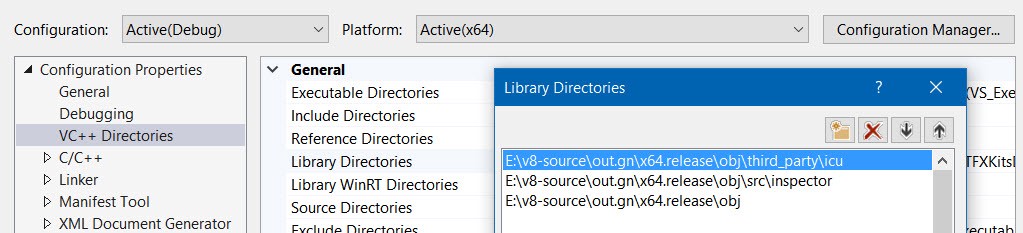
Replace the s8vm.cpp file from U8 service
Build the application
And now finally we’re ready build. Go to Build->Build solution or press Ctrl+Shift+B. This will generate an executable file to the following location:
..\project-folder\x64\Release\s8vm.exe
A few more bits
V8 requires two files located in …\v8-source\out.gn\x64.release for a startup: snapshot_blob.bin
natives_blob.bin
Copy them to where the executable is. That’s it. You can now run s8vm executable from the command line.