Specially the download of coco8 contribution.
This contribution is our starting point for developing iOS apps with S8.
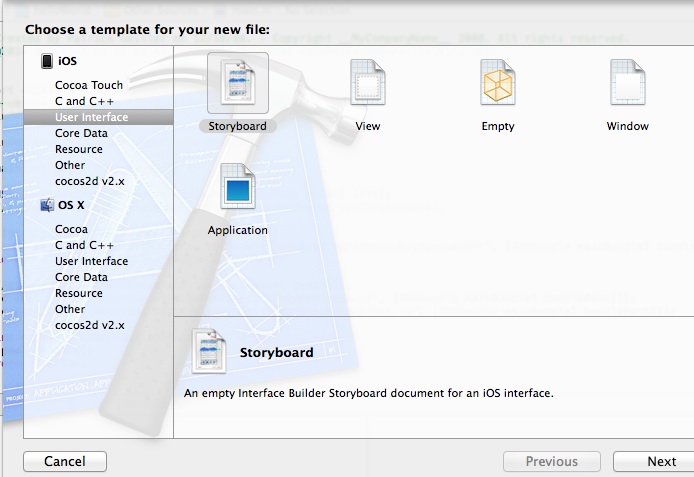
| Before starting this tutorial, be sure you have met all of the requirements for iOS with S8 development. Specially the download of coco8 contribution. This contribution is our starting point for developing iOS apps with S8. |
| Note | The coco8 application is under continuos development; it is our source and guide to evolve to a robust dev. toolset for iOS; so it is reccomended to join our iOS testers group to download updates. |
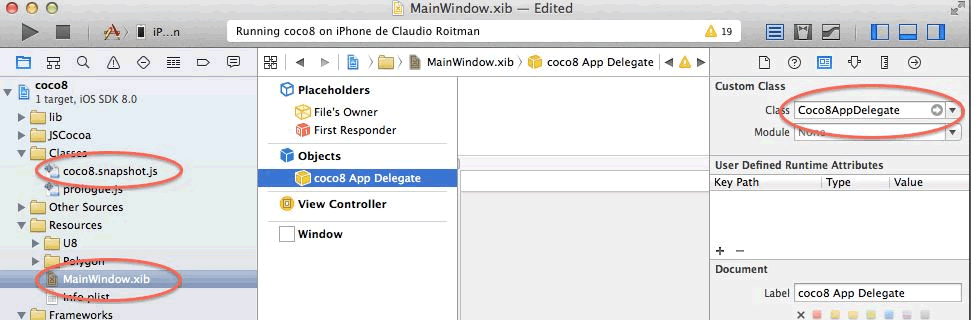
! Coco8AppDelegate methodsFor: #ObjC !
applicationDidFinishLaunching: application
	" Private - Implements ObjC's post App launch action. "

	<objC: method>
	self window
		frame: UIScreen mainScreen bounds;
		rootViewController: self tabBarController;
		makeKeyAndVisible.
	NSFileManager installHooks.! !
! Coco8AppDelegate methodsFor: #tabs !
tabsSpecification
	" Private - Specification of main application tabs. "

	^#(
	#( #U8ApplicationsController #apps )
	#( #U8WorkspaceNavigationController #workspace )
	#( #U8BrowserNavigationController #browse )
	#( #U8MessagesNavigationController #messages )
	#( #U8TranscriptController #transcript )
	#( #U8InspectorNavigationController #inspector )
	#( #U8ServiceController #u8 )
	#( #U8SettingsController #settings )
	#( #U8ServersController #network )
	#( #PolygonViewController #polygon )
	) select: [:tuple| Smalltalk includesKey: tuple first ]! !
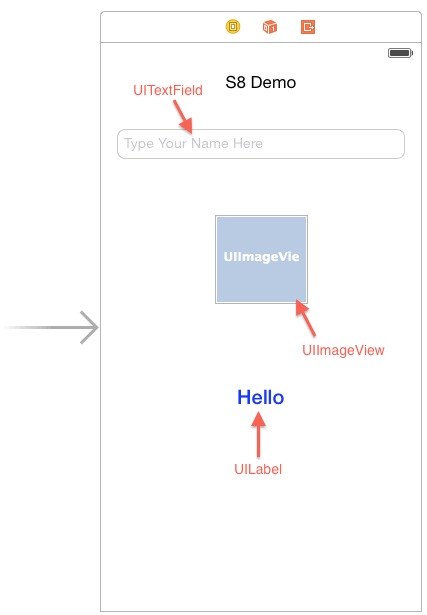
                        <subviews>
                            <textField opaque="NO" clipsSubviews="YES" contentMode="scaleToFill" ... id="W96-dh-CLq">
                                <rect key="frame" x="16" y="86" width="288" height="30"/>
                                ...
                            </textField>
                            <label opaque="NO" userInteractionEnabled="NO" contentMode="left" horizontalHuggingPriority="251" ... id="mcm-yA-qCm">
                                <rect key="frame" x="16" y="289" width="288" height="127"/>
                                <fontDescription key="fontDescription" name="HelveticaNeue-Medium" family="Helvetica Neue" pointSize="20"/>
                                <color key="textColor" red="0.0" green="0.0" blue="1" alpha="1" colorSpace="calibratedRGB"/>
                                <nil key="highlightedColor"/>
                            </label>
                            <imageView userInteractionEnabled="NO" contentMode="scaleToFill"  ... id="ziH-JK-PzL">
                                <rect key="frame" x="114" y="172" width="93" height="89"/>
                              ...
                              ...
                            </imageView>
                            ...
                            ...
                    </view>
                    <connections>
                        <outlet property="dayMomentImageView" destination="ziH-JK-PzL" id="Abc-jq-542"/>
                        <outlet property="nameTextField" destination="W96-dh-CLq" id="PSC-aC-djj"/>
                        <outlet property="salutationLabel" destination="mcm-yA-qCm" id="Zqy-ai-6U1"/>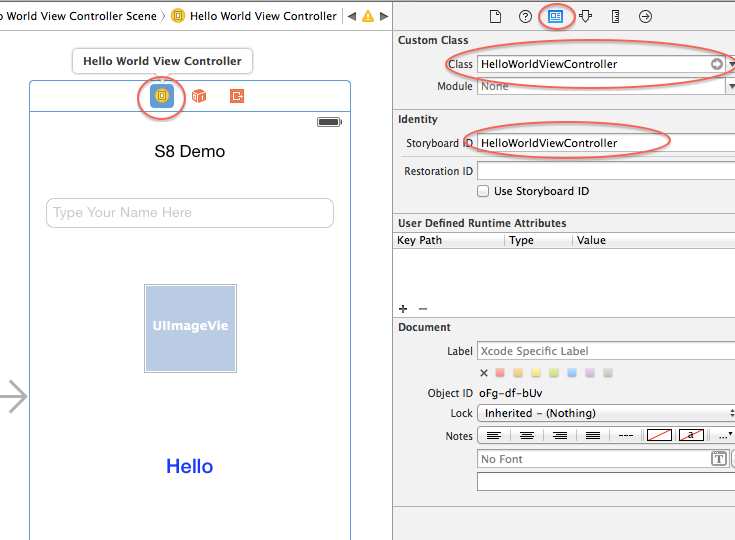
</connections>UIViewController subclass: #HelloWorldViewController instanceVariableNames: '' classVariableNames: '' category: #HelloSample!
! HelloWorldViewController class methodsFor: #ObjC !
implementation
	" Private - Return the implementation literal of the receiver. "

	^(#outlets -> #(nameTextField salutationLabel dayMomentImageView))
	,(#actions -> #(#sayHello:))
	,(#methods -> #(
		#viewDidLoad
		#(#textFieldShouldReturn: 'BOOL id')
		))! !
HelloWorldViewController buildTypedAccessors: #(
	#( salutationLabel #UILabel )
	#( nameTextField #UITextField )
	#( dayMomentImageView #UIImageView )
)! !
! HelloWorldViewController methodsFor: #ObjC !
viewDidLoad
	" Private - Load/Set the view. "


	<objC: method>
	self salutationLabel text: ''.
	self nameTextField delegate: self.
	self nameTextField
		addTarget: self
		action: #sayHello:
		forControlEvents: 262144 "UIControlEventEditingDidEnd".
^self super: #{arguments}! !! HelloWorldViewController methodsFor: #ObjC ! textFieldShouldReturn: aFieldHandle " Private - Load/Set the view. " <objC: method> ^(UITextField @ aFieldHandle) resignFirstResponder! !
! HelloWorldViewController methodsFor: #ObjC !
sayHello: sender
	" Private - Refresh the table contents. "

	| userName dayMoment nowHours salutationText |
	<objC: method>
	userName := self nameTextField text.
	nowHours := DateTime now hours.
	(nowHours between:0 and:5)|| (nowHours >= 21) ifTrue:[ dayMoment := 'Night'].
	(nowHours between:6 and:11) ifTrue: [ dayMoment :='Morning'].
	(nowHours between:12 and:17) ifTrue: [ dayMoment :='Afternoon'].
	(nowHours between:18 and:20) ifTrue: [ dayMoment :='Evening'].
	self dayMomentImageView image: (UIImage named: dayMoment asLowercase).
	salutationText := 'Good ',dayMoment, String cr, userName.
	self salutationLabel text:salutationText.! !
! HelloWorldViewController class methodsFor: #loading !
storyboardName
	" Return the storyboard name of the receiver (or nil). "

	^#HelloWorld! !
! Coco8AppDelegate methodsFor: #tabs !
tabsSpecification
	" Private - Specification of main application tabs. "

	^#(
	#( #HelloWorldViewController #hello )
	#( #U8WorkspaceNavigationController #workspace )
	#( #U8BrowserNavigationController #browse )
	#( #U8MessagesNavigationController #messages )
	#( #U8TranscriptController #transcript )
	#( #U8InspectorNavigationController #inspector )
	#( #U8ServiceController #u8 )
	#( #U8SettingsController #settings )
	#( #U8ServersController #network )
	#( #PolygonViewController #polygon )
	) select: [:tuple| Smalltalk includesKey: tuple first ]! !