[View]  [Edit]  [Lock]  [References]  [Attachments]  [History]  [Home]  [Changes]  [Search]  [Help] 

[pi8] Using MPU6050 Gyroscope-Accelerometer

Please take a look at MPU6050 datasheet and MPU6050 datasheet rev4.2.
See also GPIO pinout to explore different pin interfaces.

Requirements

In addition to your Raspberry Pi running Raspbian & S8, what you will need is:
BreadBoardUploaded Image: breadboard.png
A MPU6050 Gyroscope Accelerometer x1Uploaded Image: mpu6050.png
Male-Female jumper wiresUploaded Image: jWires.jpg

J8 Expansion Header

Check the GPIO pins layout on your pi device.

Making connections

Uploaded Image: mpu6050-connections.png

First try with MPU6050

  1. System setup.
    1. Enabling the Raspberry Pi i2c on Raspbian.
      1. Open the applications menu.
      2. Choose "Preferences"
      3. Choose "Raspberry Pi Configuration"
      4. On "Interfaces tab" activate I2C
        Uploaded Image: enabling i2c.png
    2. MPU6050 it is an I2C board. Install the relevant Linux drivers, open the modules file
      $ sudo nano /etc/modules
      add the following lines to the bottom of the file,
      i2c_bcm2835
      i2c-dev
      save it and reboot the Pi. Note: you can check your current loaded modules with
      $ lsmod
    3. Check the blacklists file
      $ sudo vi /etc/modprobe.d/raspi-blacklist.conf

      and make sure that the following lines start with a # (a comment) if they are present, if not don't worry
      #blacklist spi-bcm2835
      #blacklist i2c-bcm2835
  2. Iteracting with MPU6050
    1. Install i2c tools
      $ sudo apt-get install i2c-tools
      
      then detect the device with
      $ sudo i2cdetect -y 1
      you should see output showing any I2C devices that are attached and their addresses
      Uploaded Image: i2cdetect.png
      This shows that the Pi has detected the sensor with an address of 0x68 (hexadecimal), this address is needed to interact with it. Enter the following command and you should get an output of 0x68 on screen if everything is working properly.
      $ sudo i2cget -y 1 0x68 0x75
      This command talks to the device whose address is 0x68 (the sensor) and retrieves the value in the register 0x75 (the register WHO_AM_I) which has a default value of 0x68 the same value as the address. See MPU6050 datasheet rev4.2 for a detailed info about MPU6050 register map.

Using MPU6050 sensor with S8

  1. Start your S8 system server executing
    $ sudo node n8.snapshot.js
    take note of the server address e.g. SystemServer running at http://192.168.1.???:8088
  2. connect from U8 tools image to S8 system running in your Raspberry Pi.
  3. Load i2c-bus framework to your system (using the remote/connected workspace) doing a #fileIn.
  4. Finally copy this few lines to your remote workspace. Just select/paint all this code and click on #doIt button
    | mpu6050 step mpuAddr pwrMgmt1 gyroConf delay
    accelConf accelXOutH accelYOutH accelZOutH
    gyroXOutH gyroYOutH gyroZOutH 
    accx accy accz read step
    gx gy gz count degRes gRes|
    
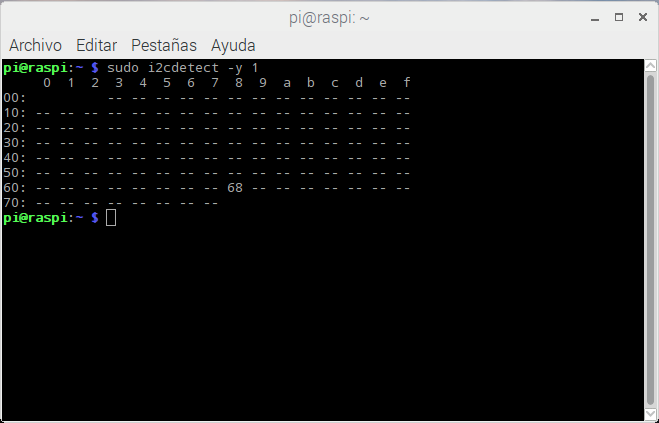
    mpuAddr := 104. "hex:0x68 bin:0b1101000 mpu6050 address in slave mode. See datasheet section 9.2"
    pwrMgmt1 := 107. "hex: 0x6B , reset mpu PWR_MGMT_1. See section 4.28 datasheet rev 4.2"
    gyroConf := 27.  "hex: 0x1B, accesing GYRO_CONFIG. See section 4.4 datasheet rev 4.2"
    accelConf := 28.  "hex: 0x1C, accesing ACCEL_CONFIG. See section 4.5  datasheet rev 4.2"
    
    accelXOutH := 59. "hex:0x3B regiter ACCEL_XOUT_H. See section 3 datasheet rev 4.2"
    accelYOutH := 61. "hex:0x3D regiter ACCEL_YOUT_H. See section 3 datasheet rev 4.2"
    accelZOutH := 63. "hex:0x3F regiter ACCEL_ZOUT_H. See section 3 datasheet rev 4.2"
    
    gyroXOutH := 67. "hex:0x43 regiter GYRO_XOUT_H. See section 3 datasheet rev 4.2"
    gyroYOutH := 69. "hex:0x45 regiter GYRO_YOUT_H. See section 3 datasheet rev 4.2"
    gyroZOutH := 71. "hex:0x47 regiter GYRO_ZOUT_H. See section 3 datasheet rev 4.2"
    
    accx := 0.
    accy := 0.
    accz := 0.
    
    gx := 0.
    gy := 0.
    gz := 0.
    delay := 100.
    degRes := 131. "Degrees resolution. See section 4.19 datasheet revision 4.2"
    gRes := 16384. "Gravity resolution. See section 4.17 datasheet revision 4.2"
    
    read := [:command :div| |buf value|
    	buf:= NodeBuffer size: 2.
    	mpu6050 readI2cBlockSync: mpuAddr cmd: command length: 2 buffer: (buf handle).
    	value := ((buf readInt8:0 ) * 128) + (buf readInt8:1 ).
    	value/div.	
    ].
    step :=[
    	accx := read value: accelXOutH value: gRes.
    	accy := read value: accelYOutH value: gRes.
    	accz := read value: accelZOutH value: gRes.
    	gx := read value: gyroXOutH value: degRes.
    	gy := read value: gyroYOutH value: degRes.
    	gz := read value: gyroZOutH value: degRes.
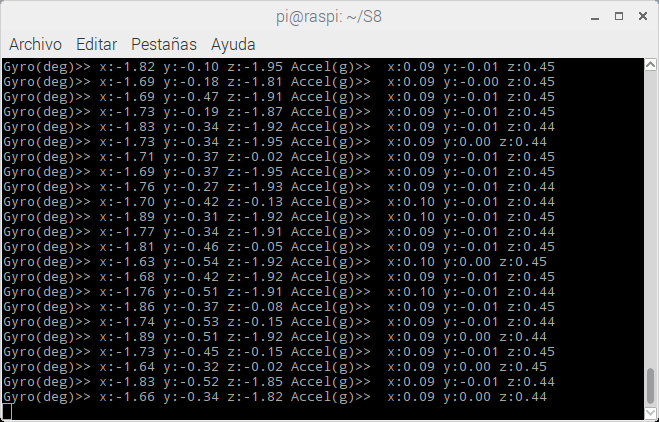
    	self print: 'Gyro(deg)>> x:', (gx #toFixed:2) , ' y:', (gy #toFixed:2) , ' z:', (gz #toFixed:2), 
    		' Accel(g)>>  x:', (accx #toFixed:2) , ' y:', (accy #toFixed:2) , ' z:', (accz #toFixed:2).
    	step valueDeferred: delay.
    ].
    mpu6050 := RPI i2cBus openSync:1. 
    mpu6050 
    	writeByteSync: mpuAddr cmd: pwrMgmt1 byte: 0;
    	writeByteSync: mpuAddr cmd: gyroConf byte: 0;
    	writeByteSync: mpuAddr cmd: accelConf byte: 0.
    step value.

    What you'll see is an endless output (console) showing the current values of MPU6050 every 100 ms.
    Uploaded Image: running.png
    Congratulations!!

References